This is a continuation of my Microsoft v2 Endpoint Series. If you haven’t read this article yet, I highly recommend starting there. I will be glossing over several bits of configuration we previously covered.
As developers dig into Microsoft Graph, they inevitably find themselves needing permission scopes that require “Admin Consent”. These are scopes that have deemed worthy of requiring an Administrator to sign off before allowing lowly “normals” to authorize your application.
User vs Admin Consent
While this article is focused on obtaining Admin Consent flow, it is also important to understand the Consent process and the differences between User and Admin Consent.
For a more detailed explanation, see v2 Endpoint & Consent
Delegated vs Application Scopes Scopes
Graph has two categories of permission scopes; Application & Delegated. These serve two distinct purposes:
-
Delegated: If your application acts on “behalf” of a single user, you’re looking for delegated permissions. Many Delegated permissions can be consented to by normal users. Other higher-privileged permissions require administrator consent, however.
-
Application: If your application runs without a user context such as a background service or daemon, you’re looking for Application permissions. Unlike Delegated permission, Application permissions always require administrator consent.
Which scopes get applied to your token depends on which type of OAuth Grant you used to request that token. When you’re using
Authorization CodeorImplicitgrants then you’ll be using Delegated scopes. If you’re usingClient Credentialsthen you’re using Application scopes.
For the moment, I’m going to assume the application in question here is a traditional web app that happens to require access to higher-privileged scopes. This scenario is also used for daemon apps but there are enough nuances around daemons to deserve its own article.
Scope Differences
When using the v2 Endpoint, you can dynamically request scopes during authorization. This allows you to only request the minimum access required for a given user. For example, if you’re application supports syncing both Calendars and Contacts but your user only wants to leverage the Calendar integration, you can forgo requesting access to Contacts. This provides some additional assurance to the user that your application is behaving as expected.
Things operate a bit differently when Admin Consent is required. These scopes must be defined with your application registration. This ensures administrators that there is some stability around the permissions you’re requesting. It is important to note that this doesn’t change how dynamic scopes operate; you can still dynamically choose to not request these admin scopes.
Defining these scopes is done within your application registration. You can define both Delegated and Application permissions here:

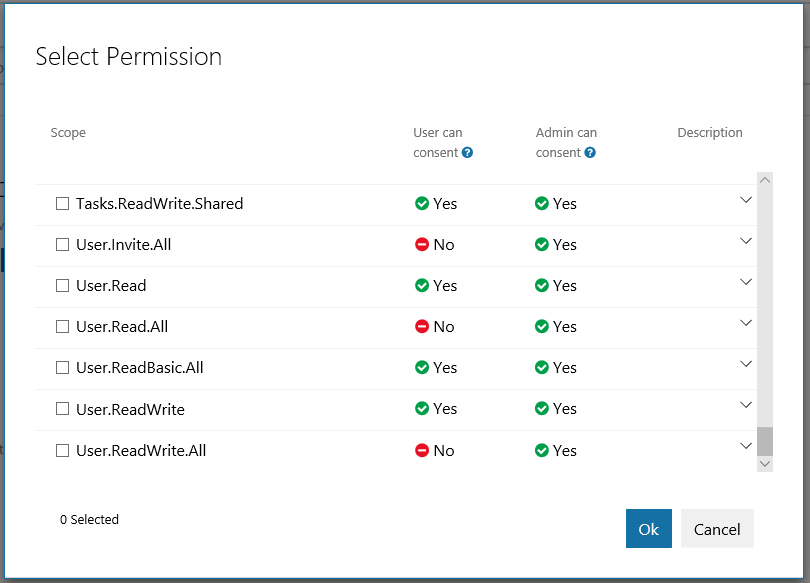
Clicking add will display a list of available permissions:

At a minimum, you need to declare any scopes that require administrative consent. While you’re certainly able to define other scopes, this isn’t a requirement.
Obtaining Consent
Before any normal (non-admin) users can an application that requires higher-privileged scopes, an admin must first provide consent. This is a one-time event. Once an admin provides the “thumbs up”, every user within that organization will be able to authorize your application.
Admin Consent is kicked off with a simple GET request (typically just a link that an Admin follows) to https://login.microsoftonline.com/common/adminconsent along with the following query parameters:
| Property | Description |
|---|---|
client_id |
This is your Application ID (see Microsoft v2 Endpoint Primer for more information) |
redirect_uri |
This is the URI you want to redirect them too after consent (more in a moment) |
The prototype for this call looks like this:
https://login.microsoftonline.com/common/adminconsent?
client_id=[APPLICATION ID]&redirect_uri=[REDIRECT URI]
When the admin logs in they will be presented with the list of permission you selected during registration. Once they accept the scopes, they will be returned to the redirect_uri you specified.
During redirection, you will receive some additional data in for form of query parameters:
http://localhost:3000/consentReturn/?tenant=[tenant id]&admin_consent=[True/False]
tenant- This is the GUID for the tenant that was authorized. This allows you to capture which tenant consent was granted for.admin_consent- This returns true if they consented and false if they declined
Post Consent
Once the tenant has consented to your permissions, you can begin authenticating users using the traditional OAuth workflow. Features such as dynamic scopes and refresh tokens continue to operate in the same way as well.
One common issue that folks run into, particularly early on in development and testing, are errors being raised after changing the application’s scopes. It is important to remember that Consent is granted for a fixed set of scopes. If those scopes should change, additional consent is required.
For User Consent this typically isn’t an issue since the user is simply presented with an updated Consent page the next time they authenticate. For Admin Consent, however, you will need to repeat the Admin Consent process in order to cover those new scopes.
Microsoft v2 Endpoint Series
*Microsoft v2 Endpoint Primer *v2 Endpoint & Implicit Grant *v2 Endpoint & Consent *v2 Endpoint & Admin Consent
Further Reading
- Azure AD v2 and MSAL from a developer’s point of view by Joonas Westlin