Until recently Microsoft had two very distinct systems for authenticating users; Microsoft Account (or MSA) and Azure Active Directory (or Azure AD). Both served the same purpose but for very different audiences; MSA for consumer services and Azure AD for enterprise services. For a while this separation worked reasonably well. While application required different integrations, most applications tended to sit squarely in one market or the other.
Over time however, the distinction between “Enterprise” and “Consumer” applications has eroded. Today we it is extremely common to find publishers targeting both markets with the same solution and users with multiple accounts for work and personal use. Having to support distinct authentication integrations quickly became a pain point. The solution to this pain is the Microsoft v2 Endpoint (previously known as “Converged Authentication”).
What is v2 Endpoint
The v2 Endpoint allows applications to authenticate both Microsoft Accounts and Azure AD accounts using a single OAUTH2 endpoint. This allows developers to build applications that are entirely account-agnostic. You no longer need to know which type of account the user owns. More importantly, you no longer need to ask to user to tell you what type of account they have (which to be honest, 90% of users likely have no idea how to answer).
Obviously there are some APIs may have different data sets depending on the account type. Microsoft Graph for example provides access to a number of APIs common to MSA and Azure AD accounts (Outlook, OneDrive, etc.) but some APIs only apply to enterprise accounts (Delve, SharePoint, etc.). To support these scenarios your application can determine the account type at run-time. The key difference here being that your application can pragmatically find the account type than relying on the user to tell your code.
OAUTH & Grant Types
The v2 Endpoint uses OAUTH2 for authorization and supports most OAuth Grant types (Authorization Code, Implicit and Client Credentials). If you’re not familiar with OAUTH (and OAUTH2 specifically), a Grant Types defines the workflow used for a particular OAUTH transaction. They all provide the same output, a token representing the authenticated user. Where they differ is how that token is obtained. In an effort to avoid going down a rabbit hole, I won’t go into the details of OAUTH and the various grant flows. I will instead point you to an excellent article on the topic.
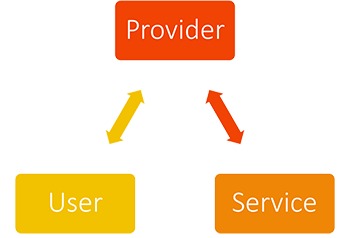
OAUTH is based on verifiable trusts. The User trusts the OAUTH Provider (they opened an account there), the Service trusts the OAUTH Provider (they redirect the user there to authenticate) and the Provider trusts both the User and the Service. This is where Application Registration comes into play. Just as the Provider trusts the User because the User has an account on their system, the Service must do the same. Think of Application Registration as an account record for your application and just as the user has a “User ID”, your application will receive an “Application ID”.
In essence, we have a triangle with assumed trusts between the User and the Provider (the user’s account) and the Service and the Provider (the app registration).
In order to complete the triangle and receive an authorization token we need to verify trust between the User and the Service.
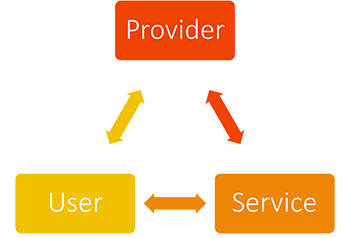
That third leg of trust is represented by an authorization token passed between the User and the Service with each call.
Application Registration
Microsoft provides a portal for registering your application at https://apps.dev.microsoft.com. After opening this page and logging in with your Microsoft Account, you are presented with a list of registered application and a button labeled “Add an app”.
If you’ve used an Work/School Account (AAD) to login to
apps.dev.microsoft.comthen you will see two groups of applications: Converged applications and Azure AD only applications. The v2 Endpoint is a “Converged” endpoint, meaning that it supports both AAD and MSA accounts. For our purposes here, we will only be using Converged applications.

Clicking this button will prompt you for the name of your application:
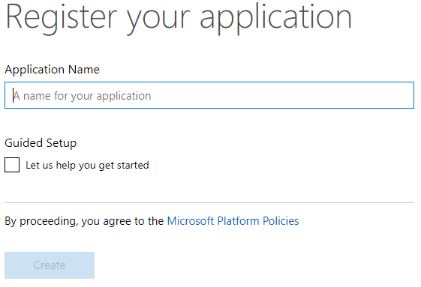
Once you’ve named your application and clicked “Create application” you are redirected to your application’s profile page.
v2 Registration vs. Azure AD Registration
If you’ve worked with Azure AD in the past you will notice some similarities here. The general architecture is the same, the user experience however is far more straightforward. If you’ve not worked with Azure AD in the past then you’ll have to trust me, this is a simplified experience.
The first item to take note of is the Application ID. This is one of the elements required for the OAUTH workflow. You will also see options for generating Client Secrets (aka Passwords). A single applications can have multiple Client Secrets assigned. This allows you to use the same registration for both traditional web sites, single-page apps and native clients.
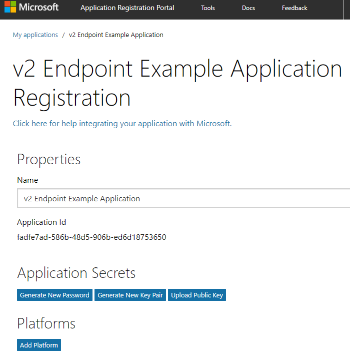
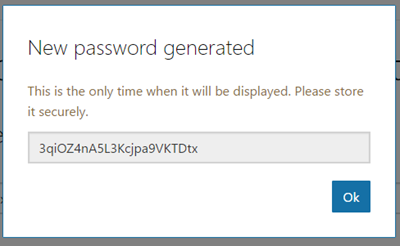
For this example I’m going to focus on the traditional web scenario. We will need two components for this workflow, a Password (aka Client Secret) and a Platform record. To get started we will need to click “Generate New Password”. This will open a dialog with your new Password. Save this in a safe place because once you close this dialog you will never see this password again.
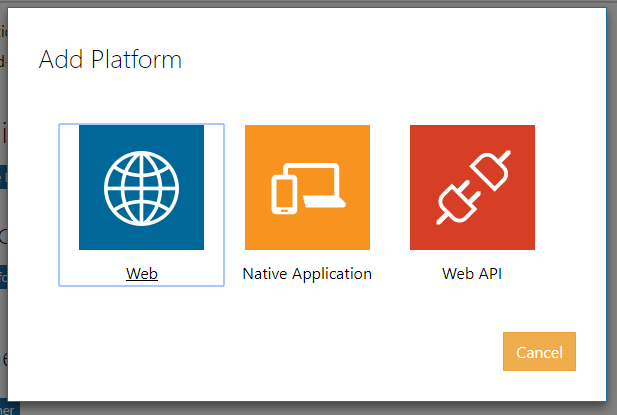
Next we will need to click “Add Platform”. This presents a dialog with two options. We’ll select “Web” for this example.
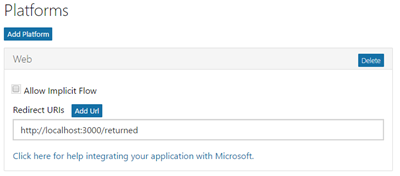
This will add a new Web platform card to your registration page. This card has two properties, Allow Implicit Flow and Redirect URI. We will not be implementing the Implicit workflow in our example so you can uncheck that option. The Redirect URI is where the user will be redirected back to once they have authenticated. The value will depend on your implementation and if you’re using a framework (such as Grant) you will need to check with the framework documentation. For my simple example here I am using redirecting to a local server at http://localhost:3000/returned.
If you want to play around with the Implicit Grant workflow, you can leave
Allow Implicit Flowchecked. It doesn’t impact the Authorization Code Grant workflow and I’ve only disabled it for the sake of completeness. Leaving it enabled won’t cause problem here. In production it should only be enabled if you truly need it since it does allow for a less secure workflow.
Requesting a Token
In this example I’m going to focus on using the Authorization Code Grant workflow with a traditional web app/site. This is the most common of the grant type and is a bit more secure Implicit Grant workflow. If your application can support Authorization Code Grant than you app should use it. It is also the most complex of the workflows which makes it a great place to start. Once you understand how the Authorization workflows functions it is relatively easy to transition to the Implicit workflow.
The Authorization workflow has four components. The first is a redirect to the Provider which is where the user will enter their credentials. This process will return an Authorization Code back to the Service. The Service will then send an HTTP POST back to the Provider where that Authorization Code is converted into a Bearer Token. This Token is returned to the Service and will be included with any API calls back to Microsoft.

The first call into the v2 Endpoint is a simple GET request (typically just a link the user clicks) to https://login.microsoftonline.com/common/oauth2/v2.0/authorize along with several query parameters:
| Property | Description |
|---|---|
client_id |
This is your Application ID from above |
response_type |
For this example it should always be “code” |
redirect_uri |
This must be the same URI you entered earlier in the Platform configuration. |
scope |
This tells the Provider what permissions you need for the APIs (more on this in a moment) |
The prototype for this call looks like this:
https://login.microsoftonline.com/common/oauth2/v2.0/authorize?
client_id=[APPLICATION ID]&response_type=code&
redirect_uri=[REDIRECT URI]&scope=[SCOPE]
Scopes
The scope parameter is a space delimited list of permission scopes your application requires.
For example, if you are looking for permission to read the current user’s profile you would send
scope=User.Read. If you also need access to the user’s inbox, you would addMail.Read, changing yourscopeparameter toscope=User.Read Mail.Read.In situations where you need to communicate with multiple APIs, specifying
User.Readby itself could result in ambiguity between which API you’re requesting that scope from. To resolve this ambiguity, you can prefix each scope with the resource you’re requesting it from. For Microsoft Graph this ishttps://graph.microsoft.com. Using the example scopes above, yourscopeparameter would bescope=https://graph.microsoft.com/User.Read https://graph.microsoft.com/Mail.ReadFor more information on scopes and what access they provide, please see Microsoft Graph permission scopes.
Once the user has completed signing in, the Provider will redirect back to your Redirect URI. The Provider will add a “code” query parameter to this URI. The value of this parameter is your authorization code. You will need to extract this value from the URI so you can use it in the next stage, requesting the Bearer Token.
Once you have the Authorization Code you will need to make an HTTP POST back to the provider. The POST’s body must be encoded as “application/x-www-form-urlencoded” and contain the following parameters:
| Property | Description |
|---|---|
grant_type |
Should be authorization_code |
code |
The auth code you received from the Provider |
client_id |
This is your Application ID from above |
client_secret |
This is the Password we generated previously |
scope |
This should match the same set of scopes you initial requested |
redirect_uri |
This is the redirect URI defined in your application registration |
This body will be POSTed up to https://login.microsoftonline.com/common/oauth2/v2.0/token. The prototype for this call should look like:
https://login.microsoftonline.com/common/oauth2/v2.0/token
Content-Type: application/x-www-form-urlencoded

grant_type=authorization_code&
code=[AUTHORIZATION CODE]&
client_id=[APPLICATION ID]&
client_secret=[PASSWORD]&
scope=[SCOPE]&
redirect_uri=[REDIRECT URI]
Once the Provider has processed this request, it will return a JSON object containing the following properties:
| Property | Description |
|---|---|
access_token |
This is the actual token. |
expires_in |
Number of seconds until this token expires and can no longer be used. |
token_type |
This tells you what type of token you have. It should always be “bearer”. |
scope |
This is the list of scopes you have been granted access too. |
Example JSON
{
  "access_token": "eyJ0eXAiOiJKV1QiLCJ...",
  "expires_in": 3599,
  "token_type": "Bearer",
  "scope": "https://graph.microsoft.com/mail.read https://graph.microsoft.com/user.read",
}
Refreshing a Token
By default, Access/Bearer tokens have a lifetime of 1 hour. After this time they are no longer valid. There are two options at this point, you can ask the user to re-authenticate (less than ideal) or you can use a Refresh Token to get an updated token.
Refresh Tokens are only returned when you include offline_access in your first scopes list. This is a special scope that does not need a full URI. Adding this scope will result in an additional property called refresh_token being returned by the provider. This refresh_token can be used to repeat the previous POST process to retrieve a newly minted bearer token.
Refresh Tokens are also only available in the Authorization Code workflow. If you are using the Implicit workflow you are limited to the initial lifetime of the token. Refresh Tokens operation similarly to the initial Authorization Code, they are exchanged with the Provider for an updated bearer token. Given that the Implicit Grant was designed to skip the Authorization Code exchange, they also cannot participate in the Refresh Token exchange.
To exorcise your Refresh Token, we need to make another HTTP POST back to the provider. The POST’s body must be encoded as application/x-www-form-urlencoded” and contain the following parameters:
| Property | Description |
|---|---|
grant_type |
Must be refresh_token |
refresh_token |
The refresh token value you received from the Provider |
client_id |
This is your Application ID from above |
client_secret |
This is the Password we generated before |
scope |
This should match the same set of scopes you first requested |
redirect_uri |
This is the redirect URI defined in your application registration |
This body will be POSTed up to https://login.microsoftonline.com/common/oauth2/v2.0/token. The prototype for this call should look like:
https://login.microsoftonline.com/common/oauth2/v2.0/token
Content-Type: application/x-www-form-urlencoded

grant_type=refresh_token&
refresh_token=[REFRESH TOKEN]&
client_id=[APPLICATION ID]&
client_secret=[PASSWORD]&
scope=[SCOPE]&
redirect_uri=[REDIRECT URI]
Once the Provider has processed this request, it will return a JSON object containing the following properties:
| Property | Description |
|---|---|
access_token |
This is the actual token. |
expires_in |
Number of seconds until this token expires and can no longer be used. |
token_type |
This tells you what type of token you have. It should always be “bearer”. |
scope |
This is the list of scopes you have been granted access too. |
refresh_token |
A new refresh token to be used for the next round |
Example JSON
{
  "access_token": "eyJ0eXAiOiJKV1QiLCJ...",
  "expires_in": 3599,
  "token_type": "Bearer",
  "scope": "https://graph.microsoft.com/mail.read https://graph.microsoft.com/user.read",
  "refresh_token": "OAAABAAAAiL9Kn2Z27...",
}
Token Lifetime
Each of the tokens described above (auth_code, access_token, refresh_token) have a defined lifetime. Once they have expired they can no longer be used. This is important to understand when you architect your authorization workflow. You need to have a strategy for handling initial authorization, invalid tokens, refreshing of tokens, etc. With refresh tokens in particular, you may need a background process automatically handling token renewal prior to them expiring.
Microsoft Account (MSA) Tokens:
| Token | Lifespan |
|---|---|
| Authorization Codes | 5 minutes |
| Access Tokens | 1 hour |
| Refresh Tokens | up to 1 year |
Azure Active Directory (AAD) Tokens:
| Token | Lifespan |
|---|---|
| Authorization Codes | 10 minutes |
| Access Tokens | 1 hour |
| Refresh Tokens | Until Revoked |
Example Application
I’ve created a very simple Node.js application using Express and Request that walks you through the entire workflow (including refreshing the token). The entire application is available on GitHub at https://github.com/mlafleur/node-v2endpoint-example.
In order to use this sample you will need to complete the Application Registration process outlined above. Once completed, you will need to add you Application ID and Password to the variables defined at the top of index.js. Running the sample will spin up a local web server at http://localhost:3000. Browsing to this page will present a page with a single link. This link represents the first stage (redirection to the Provider) of the process. Once the token is obtained it is rendered in the browser (along with a link to trigger a token refresh).
Microsoft v2 Endpoint Series
- Microsoft v2 Endpoint Primer
- v2 Endpoint & Implicit Grant
- v2 Endpoint & Consent
- v2 Endpoint & Admin Consent
Further Reading
- Azure AD v2 and MSAL from a developer’s point of view by Joonas Westlin